

How Do I Add A Decorative Border In Openoffice?
Specifying table borders
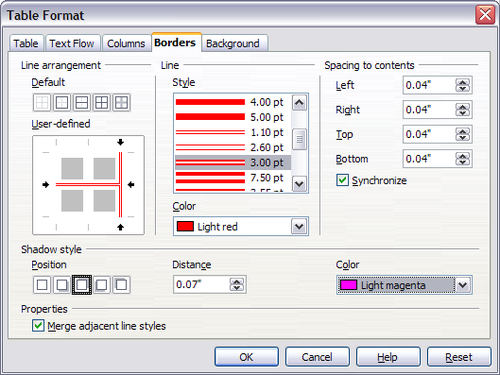
On the Table Format dialog box, select the Borders tab (Figure vi).
Here you can ready borders for a whole tabular array or groups of cells inside a table. In add-on, a shadow can be set for the whole table.
Borders accept three components: where they go, what they look like, and how much infinite is left around them.
- Line arrangement specifies where the borders go. If a group of cells is selected, the border will be applied merely to those cells. You tin can specify individually the mode of the border for the outside edges of the selected cells likewise equally for the the cell divisions. OOo provides 5 default arrangements merely you can just as easily click on the line you want to customize in the User-defined area to get exactly what y'all want. When multiple cells are selected the user defined area allow you to select the edges of the selection also equally the cell dividers. Clicking at the intersection of the lines yous can change multiple borders simultaneously (in the figure beneath, the right edge and horizontal cells separators are modified with a single operation.)
| | When the selected cells take different styles of border the Userdefined area shows the border equally a gray line. You tin click on the greyness line to choose a new border way (first click), leave the border as it is (second click) or delete the border (third click). |
![]()
Table Format dialog box: Borders page.
- Line specifies what the border looks like: the style and color. There are a number of dissimilar styles and colors to choose from. The Line Manner and Color volition apply to those borders highlighted by a pair of black arrows in the User-defined map on the left hand side of the dialog box.
- Spacing to contents specifies how much space to leave between the border and the cell contents. Spaces tin be specified to the left, correct, in a higher place, and below. Check Synchronize to have the same spacing for all four sides. This spacing is like a padding and information technology is not factored in when calculating the text measurements.
- Shadow mode properties always apply to the whole table. A shadow has 3 components: where it is, how far from the tabular array it is bandage, and what color information technology is.
- If Merge adjacent line styles is checked, two cells sharing a common border volition take their borders merged, rather than being side by side.
| | To reset everything if you lot are having problems with borders, right-click in the table and select Table or select Table > Table Backdrop from the menu bar. On the Borders tab, select the Fix No Borders icon under Line organisation: Default (the box on the left). |
Selecting groundwork colors and graphics
A tabular array groundwork tin greatly better the readability of the information, visually highlight important parts of the table (such every bit the heading or a specific cell), or just make the table more than appealing. You can choose between ii types of background when formatting the table: solid colour or graphic. The groundwork tin can be applied to the whole table, to a single cell, or to a row. The background selected for a cell will be in front of the row background which in plough will hide the table background.
The row background pick is quite handy when you want to create alternate color rows or assign a different background to the heading of the table. The tables in this guide prefer this technique.
To gear up the groundwork for a cell, row, or table:
- Identify the cursor anywhere inside the cell, row or table you want to piece of work with. If you desire to utilise a background to a group of cells, select the group.
- Right-click and select Tabular array from the pop-up menu, or select Tabular array > Tabular array Backdrop from the main menu.
- In the Table Format dialog box, select the Background tab.
- In the For section, chose whether to apply the settings to prison cell, row, or table.
- If you lot choose Cell, changes employ but to the selected cells, or the cell where the cursor currently resides. Fifty-fifty when selecting a group of cells, the background settings are applied to each cell individually.
- If you choose Row, changes impact the entire row where the cursor resides.
- If you lot choose Tabular array, changes volition set the groundwork for the entire table, regardless of the cursor position or selected cells.
- In the Every bit department, choose whether the background is a colour or a graphic.
- Beginning select the graphic from your reckoner's file system with the Scan push. (Writer supports a big number of graphics formats.)
- Y'all tin employ the Link option to link the graphic file. If it is linked, changes to the graphic (for case, if you lot edit it in a different software parcel) are reflected in your document. However, you also need to continue the linked graphic file with the document file. If, for case, you lot electronic mail the document without the graphic file, the graphic volition no longer be visible.
- Under Type, select the type of placement for the graphic.
- If you lot cull Position, you can select in the position map where the graphic will be displayed in the selected area.
- If you lot choose Area, the graphic is stretched to fill the whole area.
- If Tile, the graphic is tiled (repeated horizontally and vertically) to fill up the area.
- If the Preview selection is checked, the graphic displays in the pane on the right.
- To use the graphic, click OK.

![]()
Table Format dialog: inserting a graphic table background
To utilize a colour, select the color and click OK. Call up that you tin add custom colors past choosing Tools > Options > Colors.
To apply a graphic:
The figure below shows an case of a table fix with a groundwork image, and the first row background colored. As you lot tin encounter, the row background covers the table background.

![]()
Example of table with different row and table backgrounds
Displaying or hiding table boundaries
A table purlieus is a set of pale (ordinarily gray) lines around the cells when viewed on‑screen in OOo. These boundaries are non printed; their simply office is to help you see where the tabular array cells are.
To display the tabular array the aforementioned mode on the screen as on the printed folio, with no boundary lines, correct-click on the table and select Table Boundaries from the pop-up menu. Repeat this to have the boundaries announced again.
| | Turning boundaries off does not hibernate the borders that the table may have. |
| | You tin can as well turn table boundaries on and off through Tools > Options > OpenOffice.org > Appearance. On that folio, you can display or hide boundaries around text, pages headers and footers, figures, and other parts of a document. |
Source: https://wiki.openoffice.org/wiki/Documentation/OOo3_User_Guides/Writer_Guide/Borders_backgrounds_boundaries
Posted by: warnerseensess46.blogspot.com
0 Response to "How Do I Add A Decorative Border In Openoffice?"
Post a Comment